
Frequently Asked Questions
Most Popular FAQs
For any airline travel, it’s important that you carry a letter certifying that your blood glucose meter is in compliance with airline regulations. You can download it below.
Always ensure that your meter is set up correctly for travel, such as by turning off Bluetooth and turning on flight mode. For more information, check out this article all about traveling with diabetes.
Download
Possible causes and solutions for sudden power loss include:
| Issue: | Solution: |
|---|---|
| The meter automatically turns off after 90 seconds of inactivity. | Turn the device back on when you’re ready to use it again. |
| After completion of a test, the meter automatically turns off 15 seconds after strip removal. | Turn the device back on when you’re ready to use it again. |
| The battery compartment or battery door is faulty or damaged. | Please contact |
| The meter has been stored in extremely cold conditions (below 30°F / - 1°C). | Move to an area where the temperature is within the system's operating temperature range. Wait at least 15 minutes for the meter to equilibrate. |
| The meter is connected to a computer via the USB cable and a compatible software application is not installed on the computer. | Disconnect the cable and attempt to turn the meter on by pressing and releasing the power button. |
| The meter is connected to a computer via the USB cable and a compatible software application has turned off the meter. | Disconnect the cable and attempt to turn the meter on by pressing and releasing the power button. |
Whatever type of
While cleaning is simply removing dirt from the meter, disinfecting refers to removing as much of the disease-causing microorganisms and other germs as possible.
When to clean and disinfect your
You should clean and disinfect your meter once a week, or any time blood gets on it. You should also clean your meter before allowing anyone else to handle it.
What to use when cleaning and disinfecting your
Super Sani-Cloth® disposable pop-up wipes are a convenient way to kill germs, and have been approved for cleaning and disinfecting the meter. You can buy them online from Amazon.com, Office Depot, Walmart and other retailers.
The parts of your
Be sure to clean the areas around slots and openings, while being careful not to get any moisture in them.
You should also wipe down the entire meter surface, including the meter display.
Your meter comes with the batteries already installed and a preset time and date. You may need to change the time to match your time zone, or if you live in a state that observes daylight saving time, to reflect the time change.
Table of contents:
Accu-Chek Guide MeterAccu-Chek Guide Me Meter
How do I turn Bluetooth® off on my
- Go into the Settings menu, then Wireless, then Flight Mode. Press OK to disable Bluetooth communication.
How do I turn Bluetooth® off on my
- Press and hold the power button located on the right side of the meter until the Bluetooth® symbol disappears.
The system in your meter automatically detects when enough blood has been applied to the strip and begins the test, even if some yellow is still visible.
The only time you need to apply more blood is when the blood drop symbol continues to flash in the display.
This article contains instructions on how to replace your
Please note that your data will not be lost when you remove the batteries from your meter.
Table of contents:
Accu-Chek Guide MeterAccu-Chek Guide Me MeterAccu-Chek Guide Link meterAccu-Chek Aviva MeterAccu-Chek Aviva Connect MeterAccu-Chek Aviva Expert meterAccu-Chek Nano meter- What to do in the case of suspected battery ingestion.
- Open the child-resistant battery door by inserting a narrow object, such as a pen, into the slot.
- Push the tab in the direction of the arrow and lift the battery door up.
- Release the old batteries by pushing the release button.
- Press and hold the power/set/ok button on the front of the meter for at least 2 seconds. Wait 20 seconds.
- Slide the new batteries under the black tabs with the (+) side facing up.
- Put the battery door back in place and snap it closed. In addition, this video shows you how to change the batteries of the
Accu-Chek Guide meter.
- Open the child-resistant battery door by inserting a narrow object, such as a pen, into the slot.
- Push the tab in the direction of the arrow and lift the battery door up.
- Remove the old batteries.
- Press and hold the power/set/ok button on the front of the meter for at least 2 seconds. Wait 20 seconds.
- Slide the new batteries under the black tabs with the (+) side facing up.
- Put the battery door back in place and snap it closed. In addition, this video shows you how to change the batteries of the
Accu-Chek Guide Me meter.
- Open the battery door on the back of the meter by pushing the tab in the direction of the arrow and pulling the door up.
- Release the old batteries by pushing the release button.
- Remove the old batteries.
- Press and hold the power/set/ok button on the front of the meter for at least 2 seconds. Wait 20 seconds
- Slide the new batteries under the black tabs with the (+) side facing up.
- Put the battery door back in place and snap it closed.
- Open the battery door on the back of the meter, remove the old battery, press any button on the meter for 2 seconds, wait 20 seconds.
- Insert the new battery with the (+) facing outwards.
- Snap the battery door back into place.
- Press the on/off button and the meter will beep.
- The setup and hour should be flashing on the display. If the date and time are correct, press and hold the on/off button for at least 4 seconds until the test strip icon appears.
- Use your thumb to slide the battery drawer out of the meter.
- Remove the old batteries.
- Replace the new ones in the battery drawer, with the (+) side facing down.
- Slide the battery drawer back into position until it locks into place.
Accu-Chek Aviva Expert meter- Remove the battery door from the back of the meter by pushing the tab in the direction of the arrow and pulling up the door.
- Remove the old batteries from the meter.
- Insert three AAA batteries with the (+) and (-) matching the marks in the battery compartment.
- Put the battery door back in place and snap it closed.
- Open the battery drawer on the back of the meter by sliding it out of the meter.
- Remove the old batteries for at least 20 seconds.
- Press any button on the meter, then insert the new batteries with the (+) facing down.
- Slide the battery drawer back into position until it locks into place.
- Press the on/off button and the meter will beep. The setup and date should be flashing on display.
- Your meter will prompt you to confirm the meter’s time and date settings. If correct, press and hold the on/off button for 4 seconds, then release.
If you have persistent issues with your batteries or power, please contact
Battery ingestion
If you suspect your child has swallowed a battery, seek medical attention immediately – prompt action is critical. Don’t wait for symptoms to develop.
Battery ingestion or insertion into the body may cause chemical burns, perforation of soft tissues, and death. Batteries, as small parts, are a choking hazard. Keep them away from children under the age of 3 years.
If the battery compartment does not close securely, stop using the product and keep it away from children. Contact
Use this guide to determine which test strips will work with your
Table of contents:
Accu-Chek Guide MeAccu-Chek GuideAccu-Chek Guide LinkAccu-Chek AvivaAccu-Chek Aviva ConnectAccu-Chek Aviva ExpertAccu-Chek Nano
The Guide System meters mentioned above use
The Aviva System meters mentioned above use
The
-
Log into your account by clicking the user icon located at the top of our website.

-
Click on "Subscriptions" in your account menu, and choose your desired subscription order frequency from the dropdown menu.

-
You can skip an upcoming order by selecting “Skip Item.”

Note: Changes to your subscription must be made by 11:59 PM ET the day before your next scheduled order date for them to take effect.
Using test strips that have expired can cause your results to be inaccurate. If your test strips have expired, throw them away and begin using a new vial of strips. The expiration date is printed on every vial of test strips.
Choosing the right Comfort Dial setting:
The most comfortable setting of your
- Whether you're using a fingertip or alternate site.
- Your skin type – softer, thinner skin requires a shallower setting than thicker skin.
- The required blood sample – the more blood you require, the higher the setting you'll need.
Start with a low setting, such as penetration depth 2, when using the device for the first time. Dial to a higher setting until the blood volume is right.
Keep in mind, it’s best to always talk with your healthcare professional before deciding if alternate site testing is right for you.
Using your
- First, you will need an
Accu-Chek FastClix lancet drum and device. Each drum contains 6 pre-set lancets. - Remove the cap from the lancing device.
- Insert the drum, white end first, ensuring to push it all the way in.
- Do not remove the drum until you’ve used all 6 lancets, as you cannot put it back in once you remove it.
- Now place the cap back on your lancing device.
- Set the penetration depth by turning the dial to match your individual skin type.
- To use the device, simply place the device up against your finger and press the button on top all the way down.
- After each test, refresh to a new lancet by pushing the white lever back and forth once.
- The number in the display tells you how many lancets you have left to use before you need to replace the drum.
This video gives visual instructions on how to set up, load and use the
FAQ Categories
General Questions
For any airline travel, it’s important that you carry a letter certifying that your blood glucose meter is in compliance with airline regulations. You can download it below.
Always ensure that your meter is set up correctly for travel, such as by turning off Bluetooth and turning on flight mode. For more information, check out this article all about traveling with diabetes.
Download
Whatever type of
While cleaning is simply removing dirt from the meter, disinfecting refers to removing as much of the disease-causing microorganisms and other germs as possible.
When to clean and disinfect your
You should clean and disinfect your meter once a week, or any time blood gets on it. You should also clean your meter before allowing anyone else to handle it.
What to use when cleaning and disinfecting your
Super Sani-Cloth® disposable pop-up wipes are a convenient way to kill germs, and have been approved for cleaning and disinfecting the meter. You can buy them online from Amazon.com, Office Depot, Walmart and other retailers.
The parts of your
Be sure to clean the areas around slots and openings, while being careful not to get any moisture in them.
You should also wipe down the entire meter surface, including the meter display.
All information is saved when you change the batteries of any
There’s no need to manually code any of our meters. You can discover more detailed information below.
There’s no need to code any of these meters, so you have fewer steps in testing.
The black
These meters come precoded with a black code key that remains in place for the life of the meter. There's no need to manually code the meter.
If you do not have a black code key, please
It’s important to keep the lancing device clean and disinfected, as it may come into contact with blood during normal testing.
Cleaning and disinfecting tips to ensure proper care without damaging your device:
- Remove the lancet drum before cleaning and disinfecting.
- Clean and disinfect the lancing device once a week, or when it has visible signs of dirt or other material.
- Clean and disinfect the lancing device before allowing anyone else to handle it, for instance if you have someone assisting you. Do not allow anyone else to use your lancing device to obtain their blood sample.
- Use Super Sani-Cloth® (available at Amazon.com, Office Depot, Walmart and other retailers) to clean the lancing device. Do not use any other cleaning or disinfecting solutions, as it could result in damage to the lancing device.
- You might notice a slight discoloration of the lancing device after multiple cleanings. This does not affect its functionality.
How to clean and disinfect the entire lancing device surface and cap:
- Wash your hands thoroughly with soap and water.
- Wipe the entire lancing device surface with a Super Sani-Cloth®. Make sure that no liquid enters any opening, as it could damage the device.
- Remove and wipe the inside of the cap.
- Dry the lancing device and cap with a soft cloth or gauze. Make sure that no solution is seen in any opening.
- Repeat these steps with a new Super Sani-Cloth® to fully disinfect the lancing device.
- Wash your hands thoroughly with soap and water
Device Settings
This article contains information regarding
Table of contents:
Accu-Chek Guide MeterAccu-Chek Guide Link MeterAccu-Chek Aviva MeterAccu-Chek Aviva Expert MeterAccu-Chek Nano Meter
How do
You can set up to 4 general test Reminders per day to remind you to test. A series of beeps sound and a bell is displayed for reminders set in the meter.
About Guide Me reminders:
- Turn off by inserting a test strip or pressing any button
- Are postponed until the next test reminder if a test was performed within 15 minutes of a test reminder
- Do not appear/beep if the meter is on at the test reminder time (including when the meter is connected to a USB cable)
- Do not appear/beep if the meter is connected and communicating to a Continua Certified® manager.
- Do not beep if the meter beeper is set to off.
- Do not appear/beep if the batteries need to be replaced
About pre-set reminders:
- Reminder times are pre-set in the meter for 8:00 am, 12:00 pm, 6:00 pm, and 10:00 pm. You may change reminder times by following the instructions below.
- If a general test Reminder is set for the same time as a Post Meal reminder, the Post Meal reminder will appear/beep instead of the general Reminder
Changing pre-set test reminder times:
- Turn the meter on by briefly pressing the “OK”
- Press down to highlight Settings. Press “OK"
- Press down to highlight More Options. Press “OK”
- Press down to highlight Reminders. Press “OK”
- Pre-set reminder times appear on the display. Press down to highlight the time you want to edit. Press “OK”
- Press down to highlight Edit time. Press “OK”
- Press up or down to adjust each field.
- Press “OK” to move to the next field.
- Press “OK” to return to the previous menu.
How do
You can set up to 4 general test Reminders per day to remind you to test. A series of beeps sound and is displayed for reminders set in the meter.
About Guide Me reminders:
- Turn off by inserting a test strip or pressing any button
- Are postponed until the next test reminder if a test was performed within 15 minutes of a test reminder
- Do not appear/beep if the meter is on at the test reminder time
- Do not appear/beep if the meter is connected and communicating to the paired pump
- Do not beep if the meter’s beeper is set to off
- Do not appear/beep if the batteries need to be replaced
About pre-set reminders:
- Reminder times are pre-set in the meter for 8:00 am, 12:00 pm, 6:00 pm, and 10:00 pm
- If a general test reminder is set for the same time as a post meal reminder, the post meal reminder will appear/beep instead of the general reminder
How do
You can set up to 4 test reminders per day. At the set reminder time, the meter will beep every 2 minutes, up to 3 times per reminder.
About Aviva test reminders:
- Turn off reminder beeps by going into setup mode and turning the beeper off.
- Are postponed until the next test reminder if a test was performed within 30 minutes of a test reminder
- Do not appear/beep if the meter is on at the test reminder time
About Aviva meal markers:
- With the
Accu-Chek Aviva black meter, marking results with a pre-meal or post-meal marker can provide more information about how food affects your blood sugar, to aid in managing your numbers. - You can also use a general marker to identify a non-fingertip test or post-exercise result. These markers can help you remember what was different about the result when you review your results in the meter’s memory.
How do
You can set up to 8 alarm clock reminders per day for tests, injections or other events, as well as automatic reminders after high or low blood glucose results, or after certain meals.
About Aviva Expert test reminders:
- You can also set reminders for appointments on specific days. At the scheduled time, the meter turns on and displays the reminder, along with a sound or vibration, if a test strip has not been inserted.
- If the meter is already on and no blood glucose test has been performed, the reminder is displayed when the meter powers down. You can silence the test reminders by setting the meter to sound or vibrate mode within the meter settings.
How do
Once set, test reminders will beep every 2 minutes up to 3 times.
About Nano test reminders:
- The reminder will turn off when you insert a test strip or press any button.
- To turn the beeper off all the way, refer to the set-up instructions in your Owner's Booklet.
Your meter comes with the batteries already installed and a preset time and date. You may need to change the time to match your time zone, or if you live in a state that observes daylight saving time, to reflect the time change.
Table of contents:
Accu-Chek Guide MeterAccu-Chek Guide Me Meter
How do I turn Bluetooth® off on my
- Go into the Settings menu, then Wireless, then Flight Mode. Press OK to disable Bluetooth communication.
How do I turn Bluetooth® off on my
- Press and hold the power button located on the right side of the meter until the Bluetooth® symbol disappears.
Your meter comes with the batteries already installed and a preset time and date. You may need to change the time to match your time zone, or if you live in a state that observes daylight saving time, to reflect the time change.
Table of contents:
Accu-Chek Guide MeterAccu-Chek Guide Me MeterAccu-Chek Aviva MeterAccu-Chek Nano Meter
How to change the time and date on the
- Turn the meter on by briefly pressing “OK.” From the main menu, press the arrow key to highlight settings. Press “OK.”
- Time/date is highlighted. Press “OK.”
- Press the up or down arrows to adjust each field. Press “OK” to set and proceed to the next field. Set AM or PM if necessary.
- Press “OK” to save and return to the previous menu.
How to change the time and date on the
- Press and release the power button to turn the meter on. The flashing test strip symbol appears on the display.
- Press and hold the power button until set-up appears on the display. The hour flashes.
- Press the left and right arrow buttons to decrease or increase the hour.
- Press the power button to set the hour and move to the next field.
- Repeat steps 2 and 3 to set minutes, am or pm, month, day, and year. Press and hold the power button until the flashing test strip symbol appears to exit the set-up mode.
How to change the time and date on the
- Turn the meter on by briefly pressing “OK.” From the main menu, press the arrow key to highlight settings. Press “OK.”
- Time/date is highlighted. Press “OK.”
- Press the up or down arrows to adjust each field. Press “OK” to set and proceed to the next field. Set AM or PM if necessary.
- Press “OK” to save and return to the previous menu.
a. Note: Feature is only available if the meter is not paired with a pump. If paired with a pump, the meter time and date are automatically set to the pump’s time and date during communication.
How to change the time and date on the
This video shows you how to set the time and data on the black
Setting the time and date on the black ACCU-CHEK Aviva meter
How to change the time and date on the
This video shows you how to set the time and date on the
Getting Started
Pairing your
Follow the steps below to pair your
- If you are using an Apple device, make sure Bluetooth® is turned on.
a. Bluetooth should turn on automatically for Android users at the beginning of the pairing process.
- Ensure Location Services are turned on for the mySugr app during the pairing process. (You can turn it back off once you're done. Settings > Apps > mySugr > Location Services.)
- Open the mySugr app and go to the “Connections” tab in the bar menu located at the bottom of the screen.
- Select your meter —
Accu-Chek Guide Me,Accu-Chek Guide orAccu-Chek Aviva Connect — and follow the steps on the screen to activate it. - You'll then receive a message that pairing was successful, meaning your meter is now connected to your mobile device.
- You can return to the mySugr home screen by tapping on "My trend" in the tab menu located at the bottom of the screen.
Choosing the right Comfort Dial setting:
The most comfortable setting of your
- Whether you're using a fingertip or alternate site.
- Your skin type – softer, thinner skin requires a shallower setting than thicker skin.
- The required blood sample – the more blood you require, the higher the setting you'll need.
Start with a low setting, such as penetration depth 2, when using the device for the first time. Dial to a higher setting until the blood volume is right.
Keep in mind, it’s best to always talk with your healthcare professional before deciding if alternate site testing is right for you.
Using your
- First, you will need an
Accu-Chek FastClix lancet drum and device. Each drum contains 6 pre-set lancets. - Remove the cap from the lancing device.
- Insert the drum, white end first, ensuring to push it all the way in.
- Do not remove the drum until you’ve used all 6 lancets, as you cannot put it back in once you remove it.
- Now place the cap back on your lancing device.
- Set the penetration depth by turning the dial to match your individual skin type.
- To use the device, simply place the device up against your finger and press the button on top all the way down.
- After each test, refresh to a new lancet by pushing the white lever back and forth once.
- The number in the display tells you how many lancets you have left to use before you need to replace the drum.
This video gives visual instructions on how to set up, load and use the
Download the manual below to help you learn how to use your
Choosing the right Comfort Dial setting:
The most comfortable setting of your
- Whether you're using a fingertip or alternate site.
- Your skin type – softer, thinner skin requires a shallower setting than thicker skin.
- The required blood sample – the more blood you require, the higher the setting you'll need.
Start with a low setting, such as penetration depth 2, when using the device for the first time. Dial to a higher setting until the blood volume is right.
Keep in mind, it’s best to always talk with your healthcare professional before deciding if alternate site testing is right for you.
Using your
- First, you will need an
Accu-Chek Softclix lancet and device. - Remove the cap from the lancing device.
- Insert the lancet into the lancet holder at the bottom of the device – push it all the way in until it clicks in place.
- Twist and remove the protective cap from the lancet to expose the needle.
- Place the cap back onto the lancing device, ensuring that the notch of the cap aligns with the mark on the device.
- Set the penetration depth to match your skin type, by turning the dial on the cap.
- To use the lancing device, prime it by pressing the plunger all the way down. The release button on the side of the device should turn yellow, indicating that it is ready to use.
- Place the device up against your finger firmly, and press the release button to release the lancet.
- Be sure to replace the lancet every time you use your device, as they are not reusable and become unsterile after one use.
- To remove the used lancet, take off the cap from the lancing device and slide down the ejector over a sharps disposal bin. Then replace the cap.
This video gives visual instructions on how to set up, load and use the
Power
This article contains instructions on how to replace your
Please note that your data will not be lost when you remove the batteries from your meter.
Table of contents:
Accu-Chek Guide MeterAccu-Chek Guide Me MeterAccu-Chek Guide Link meterAccu-Chek Aviva MeterAccu-Chek Aviva Connect MeterAccu-Chek Aviva Expert meterAccu-Chek Nano meter- What to do in the case of suspected battery ingestion.
- Open the child-resistant battery door by inserting a narrow object, such as a pen, into the slot.
- Push the tab in the direction of the arrow and lift the battery door up.
- Release the old batteries by pushing the release button.
- Press and hold the power/set/ok button on the front of the meter for at least 2 seconds. Wait 20 seconds.
- Slide the new batteries under the black tabs with the (+) side facing up.
- Put the battery door back in place and snap it closed. In addition, this video shows you how to change the batteries of the
Accu-Chek Guide meter.
- Open the child-resistant battery door by inserting a narrow object, such as a pen, into the slot.
- Push the tab in the direction of the arrow and lift the battery door up.
- Remove the old batteries.
- Press and hold the power/set/ok button on the front of the meter for at least 2 seconds. Wait 20 seconds.
- Slide the new batteries under the black tabs with the (+) side facing up.
- Put the battery door back in place and snap it closed. In addition, this video shows you how to change the batteries of the
Accu-Chek Guide Me meter.
- Open the battery door on the back of the meter by pushing the tab in the direction of the arrow and pulling the door up.
- Release the old batteries by pushing the release button.
- Remove the old batteries.
- Press and hold the power/set/ok button on the front of the meter for at least 2 seconds. Wait 20 seconds
- Slide the new batteries under the black tabs with the (+) side facing up.
- Put the battery door back in place and snap it closed.
- Open the battery door on the back of the meter, remove the old battery, press any button on the meter for 2 seconds, wait 20 seconds.
- Insert the new battery with the (+) facing outwards.
- Snap the battery door back into place.
- Press the on/off button and the meter will beep.
- The setup and hour should be flashing on the display. If the date and time are correct, press and hold the on/off button for at least 4 seconds until the test strip icon appears.
- Use your thumb to slide the battery drawer out of the meter.
- Remove the old batteries.
- Replace the new ones in the battery drawer, with the (+) side facing down.
- Slide the battery drawer back into position until it locks into place.
Accu-Chek Aviva Expert meter- Remove the battery door from the back of the meter by pushing the tab in the direction of the arrow and pulling up the door.
- Remove the old batteries from the meter.
- Insert three AAA batteries with the (+) and (-) matching the marks in the battery compartment.
- Put the battery door back in place and snap it closed.
- Open the battery drawer on the back of the meter by sliding it out of the meter.
- Remove the old batteries for at least 20 seconds.
- Press any button on the meter, then insert the new batteries with the (+) facing down.
- Slide the battery drawer back into position until it locks into place.
- Press the on/off button and the meter will beep. The setup and date should be flashing on display.
- Your meter will prompt you to confirm the meter’s time and date settings. If correct, press and hold the on/off button for 4 seconds, then release.
If you have persistent issues with your batteries or power, please contact
Battery ingestion
If you suspect your child has swallowed a battery, seek medical attention immediately – prompt action is critical. Don’t wait for symptoms to develop.
Battery ingestion or insertion into the body may cause chemical burns, perforation of soft tissues, and death. Batteries, as small parts, are a choking hazard. Keep them away from children under the age of 3 years.
If the battery compartment does not close securely, stop using the product and keep it away from children. Contact
This article contains instructions on how to check the battery tabs on your
Table of contents:
Accu-Chek Guide & Guide Link MetersAccu-Chek Guide Me Meter
Checking the battery tabs on the
- Turn the meter off.
- Remove the battery door.
- Remove the batteries.
a. Open the child-resistant battery door by inserting a narrow object, such as a pen, into the slot. Push the tab in the direction of the arrow and lift the battery door up.
- Examine the battery compartment. Each battery should be held in place by the black tab on the side of the battery compartment.
- Confirm that the black tabs on the side are not bent down.
- If a bent black tab is preventing the battery from making contact, use tweezers or a small screwdriver to gently bend the tab(s) back into position.
- Each battery should be held in place by the battery ejector button with an image of a hand in the center of the battery compartment, and an additional black tab on the side of the battery compartment.
- Reinstall the batteries. The batteries must be placed in the battery compartment, under the black tabs and battery ejector button, with the “+” side facing up (visible).
- Press each battery down flat inside the battery compartment, and snap the door closed.
- Attempt to turn on the meter by pressing and releasing the power/OK button.
Checking the battery tabs on the
- Turn the meter off.
- Remove the battery door.
- Remove the batteries.
a. Open the child-resistant battery door by inserting a narrow object, such as a pen, into the slot. Push the tab in the direction of the arrow and lift the battery door up.
- Examine the battery compartment. Each battery should be held in place by the black tab on the side of the battery compartment.
- Confirm that the black tabs on the side are not bent down.
- If a bent black tab is preventing the battery from making contact, use tweezers or a small screwdriver to gently bend the tab(s) back into position.
- Reinstall the batteries. The batteries must be placed in the battery compartment, under the black tabs with the “+” side facing up (visible).
- Snap the door closed.
- Attempt to turn on the meter by pressing and releasing the power button.
Battery life on
Table of contents:
Accu-Chek Guide MeAccu-Chek GuideAccu-Chek Aviva ConnectAccu-Chek NanoAccu-Chek AvivaAccu-Chek Aviva ExpertAccu-Chek Compact Plus
These meters use two 3-volt lithium coin cell batteries (type CR2032) found in many stores.
This meter uses one 3-volt lithium coin cell battery (type CR2032) found in many stores.
These meters use two standard AAA batteries, preferably alkaline. Rechargeable batteries can also be used; however they normally provide slightly lower power.
Battery ingestion
If you suspect your child has swallowed a battery, seek medical attention immediately – prompt action is critical. Don’t wait for symptoms to develop.
Battery ingestion or insertion into the body may cause chemical burns, perforation of soft tissues, and death. Batteries, as small parts, are a choking hazard. Keep them away from children under the age of 3 years.
If the battery compartment does not close securely, stop using the product and keep it away from children. Contact
The meter can be turned on by pressing and releasing the Power/OK button or inserting a test strip. The meter can be turned off by pressing and holding the Power/OK button.
The meter can be turned on by pressing and releasing the power button or inserting a test strip.
The meter can be turned off by pressing and releasing the power button.
Possible causes and solutions for lack of power include:
| Issue: | Solution: |
|---|---|
| The meter has been exposed to extreme temperatures outside the meter's operating temperature range. | Move to an area where the temperature is within the system's operating temperature range (between 43 - 113°F / 4 - 45°C). Wait at least 15 minutes for the meter to equilibrate. |
| The meter is connected to a computer using a USB cable. If the meter times out while connected via USB, it may not respond to button presses or strip insertion until the USB cable is disconnected. | Disconnect the cable and attempt to turn the meter on by pressing and releasing the power button. |
| One or both batteries are installed incorrectly. | Confirm both batteries are inserted into the meter under the black tabs with the “+” sign facing up (visible). |
| The batteries are dead or battery power is too low for the meter to turn on. | Install two new 3 volt lithium, CR 2032 coin cell batteries. Replace both batteries at the same time and with the same brand. |
| Battery tabs are damaged or defective. | Please contact |
| The meter is damaged or defective. | Please contact |
Possible causes and solutions for sudden power loss include:
| Issue: | Solution: |
|---|---|
| The meter automatically turns off after 90 seconds of inactivity. | Turn the device back on when you’re ready to use it again. |
| After completion of a test, the meter automatically turns off 15 seconds after strip removal. | Turn the device back on when you’re ready to use it again. |
| The battery compartment or battery door is faulty or damaged. | Please contact |
| The meter has been stored in extremely cold conditions (below 30°F / - 1°C). | Move to an area where the temperature is within the system's operating temperature range. Wait at least 15 minutes for the meter to equilibrate. |
| The meter is connected to a computer via the USB cable and a compatible software application is not installed on the computer. | Disconnect the cable and attempt to turn the meter on by pressing and releasing the power button. |
| The meter is connected to a computer via the USB cable and a compatible software application has turned off the meter. | Disconnect the cable and attempt to turn the meter on by pressing and releasing the power button. |
Test Strips
Using test strips that have expired can cause your results to be inaccurate. If your test strips have expired, throw them away and begin using a new vial of strips. The expiration date is printed on every vial of test strips.
The system in your meter automatically detects when enough blood has been applied to the strip and begins the test, even if some yellow is still visible.
The only time you need to apply more blood is when the blood drop symbol continues to flash in the display.
Explore the different ways you can simply handle
- Front slide
- Side pinch
- Pinch and pull
- Back slide
Remember to follow all instructions in the package insert (wash and dry hands, do not bend or get dirt on the test strip, and close the cap tightly when finished).
Here are some visual instructions on how to handle
Use this guide to determine which test strips will work with your
Table of contents:
Accu-Chek Guide MeAccu-Chek GuideAccu-Chek Guide LinkAccu-Chek AvivaAccu-Chek Aviva ConnectAccu-Chek Aviva ExpertAccu-Chek Nano
The Guide System meters mentioned above use
The Aviva System meters mentioned above use
The
Accuracy
Table of contents:
Accu-Chek GuideAccu-Chek Guide LinkAccu-Chek Guide MeAccu-Chek AvivaAccu-Chek Nano
- Check the Use By date on the test strip container and the control solution bottles.
a. Do not use test strips or controls past the Use By date. Controls expire three months from the date of opening.
- Remove the control bottle cap. Wipe the tip of the bottle and discard the first drop of the solution into a tissue.
- Insert the metallic end of the test strip into the meter. The meter turns on. Place the meter on a flat surface.
- Apply the control solution you want to test, using either Level 1 or Level 2 control solution.
- When you see “Apply drop” appear on the display, squeeze the bottle until a tiny drop forms at the tip of the bottle.
- Touch the drop to the yellow edge of the test strip.
a. Do not put the control solution on top of the test strip.
- “Analyzing” will appear when you have enough of the control solution in the test strip.
- The control result and the control bottle symbol appear.
- While the strip is in the meter, press the up or down arrows to select the control level you tested.
- Press OK.
a. “Within range” and “✓” appear if the control result is within range.
b. “Out of range” and an "X" appear if the control result is out of range.
- Wipe the tip of the bottle with a tissue and cap the bottle tightly.
You can confirm your control results are within range by referring to the Control level 1 and Control level 2 ranges printed on the test strip container.
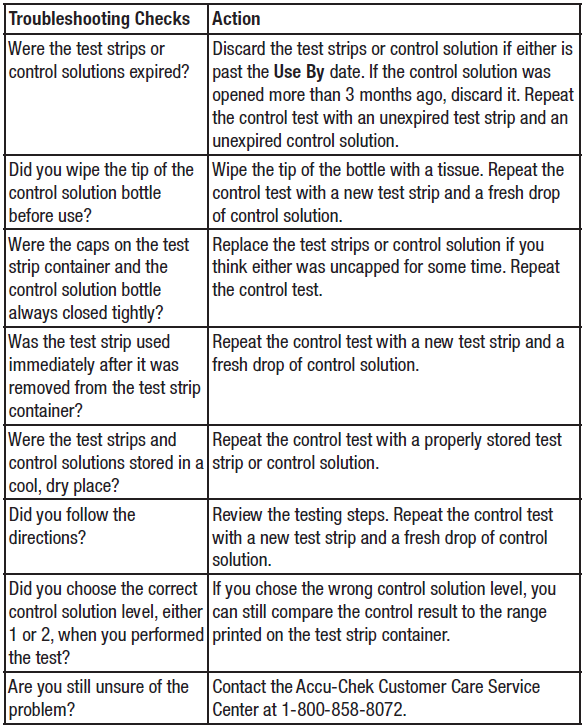
If the control results are “Out of Range,” reference the Troubleshooting Checks table below and repeat the control test.
- Check the Use By date on the test strip container and the control solution bottles.
a. Do not use test strips or controls past the Use By date. Controls expire three months from the date of opening.
- Remove the control bottle cap. Wipe the tip of the bottle and discard the first drop of the solution into a tissue.
- Insert the metallic end of the test strip into the meter. The meter turns on. Place the meter on a flat surface.
- Apply the control solution you want to test, using either Level 1 or Level 2 control solution.
- When you see the flashing blood drop appear on the display, squeeze the bottle until a tiny drop forms at the tip of the bottle.
- Touch the drop to the yellow edge of the test strip.
a. Do not put the control solution on top of the test strip. The flashing hourglass appears when you have enough solution in the test strip.
- The control result, the bottle symbol, and the flashing L1 or L2 appear on the display.
- Press the left or right arrow buttons to alternate between L1 and L2.
- Press and release the power button on the side once the correct L1 or L2 is displayed on the screen.
a. “OK” appears if the control result is within range.
b. “Err” appears if the control result is out of range.
- Wipe the tip of the bottle with a tissue and cap the bottle tightly.
You can also confirm your control results are within range by referring to the Control level 1 and Control level 2 ranges printed on the test strip container.
If the control results are “Out of Range,” reference the Troubleshooting Checks table below.
- Check the use by date on the test strip container. Do not use test strips past the use by date.
- Place the meter on a flat surface.
- Remove the cap from the control solution bottle and wipe the tip of the bottle with a lint-free wipe.
- Squeeze the bottle until a tiny drop forms at the tip.
- Touch the drop to the front edge of the yellow window of the test strip.
- Remove the bottle from the test strip when E appears. Do not put a drop on top of the test strip.
- Wipe the tip of the bottle with a lint-free wipe and cap the bottle tightly.
- The control result appears on the display. Remove and discard the used test strip per facility policy.
a. Note: If the control bottle symbol and the flashing “L” does not appear on the display with your control result, an error has occurred.
i. Do not act on the control result. Repeat the control test with a new test strip.
- You can compare the control result with the acceptable range printed on the test strip container label. If the control result is within the acceptable range, correct functioning of the system is assured.
- If the control result is outside the acceptable range or if an error message is displayed, reference the Troubleshooting Checks table below, and repeat the control test.
- If the second control result is also outside the acceptable range or an error message is displayed, contact
Accu-Chek Customer Care.
- To make sure the display is working properly, turn off the meter, then press and hold Power/Set Button located on the right side of the meter to see the complete display. All segments should be clear and complete. If any segments are missing from the display, there may be a problem with the meter.
- Check the Use By date on the test strip container. Do not use test strips past the Use By date
- Insert the test strip into the meter in the direction of the arrows.
- Place the meter on a flat surface, like a table.
- Remove the control bottle cap and wipe the tip of the bottle with a tissue.
- Squeeze the bottle until a tiny drop forms at the tip. Touch the drop to the front edge of the yellow window of the test strip. Do not put the control solution on top of the test strip. When you see the hourglass icon flash, you have enough control solution in the test strip. Wipe the tip of the bottle with a tissue, then cap the bottle tightly
- A result appears on the display along with the control bottle symbol.
- The control result and OK alternate on the display if the result is in range. The range is printed on the test strip
- container label. The control result and Err alternate on the display if the result is out of range. Remove and discard the used test strip. Check the Troubleshooting Checks table below to see what may be causing the problem and repeat the control test.
- If the second control result is also outside the acceptable range or an error message is displayed, contact
Accu-Chek Customer Care.
Performing a control test lets you know the meter and test strips are working properly.
Reasons to perform a control test, but are not limited to:
- You open a new test strip box.
- Your test result does not match how you feel.
- The test strips were stored in extreme temperatures or high humidity.
- The test strip container was left open.